Debug iOS app in Visual Studio Code
使用 LLDB 远程调试程序
调试分为本地调试和远程调试,iOS app 不管安装在模拟器还是真机,均属于远程调试。
这里简述一下大概的原理。
远程启动 lldb-server ,或者叫 debugserver, 比如使用 ios-deploy 工具开启真机的 debugserver 并将远程端口的 socket 数据转发(或者叫代理)到本机:
1 | ios-deploy --id <device_id> --nolldb --json |
输出如下:
1 | { |
DebugServerLaunched 代表真机上的 debugserver 已启动成功,本地转发端口为 61115
ps. <device_id>是你的真机的id,用命令 ios-deploy --detect 可找到真机的id。
本地启动 lldb,先通过 platform select 对应平台(用于加载系统库和符号),之后通过process connect connect://127.0.0.1:<Port> ,通过本地转发的 socket 连接到远端 debugserver 。
之后通过 lldb 设定目标执行文件及其依赖的模块,及其远端文件路径映射,即可实现远程调试
命令行启动lldb,并输入如下:
1 | (lldb) platform select remote-ios |
这时候你可能会发现报错了: error: No such file or directory (myapp.app)。
因为,对于iOS app 你需要先通过ios-deploy安装到真机上之后,才能走通这个流程:
1 | # 安装app |
可以看到输出:
1 | ... |
其中状态为Complete的BundleInstall事件中会带有Path,这就是真机上的路径,需要通过 lldb 提供的 API SetPlatformFileSpec设置远程路径:
1 | (lldb) platform select remote-ios |
这只是启动,如果要下断点,则需使用breakpoint set --name <symbol name>或者br s -n <symbol name>,如在run之前给我们的 main() 下断点:
1 | (lldb) br s -n '_main' |
如看到stop reason = breakpoint 1.1代表成功断点~
更多的详见lldb 官方Remote Debugging文档。
VSCode 调试 ios app 代码
VSCode 有个插件 CodeLLDB 支持了 LLDB,另一个插件 ios-debug 则直接使用上文提到的 ios-deploy 在 CodeLLDB 之上支持了在iPhone模拟器和真机调试iOS app。
配置 .vscode/tasks.json,定义一个编译iOS app 的 task build ios,供 VSCode 使用:
1 | { |
ps. 这里使用的是 bazel 构建系统,测试代码来自 rules_apple
pps. 思路打开,用 CMake 或者其它的也行的,只要能输出 iOS 的 .app
配置 launch.json 的 configurations,添加一个 VSCode 启动项, 因为需要调试,这里配置为由CodeLLDB 插件所定义的type lldb :
1 | { |
其中 program 的路径是由前面配置的 build ios task 输出的iOS app路径。
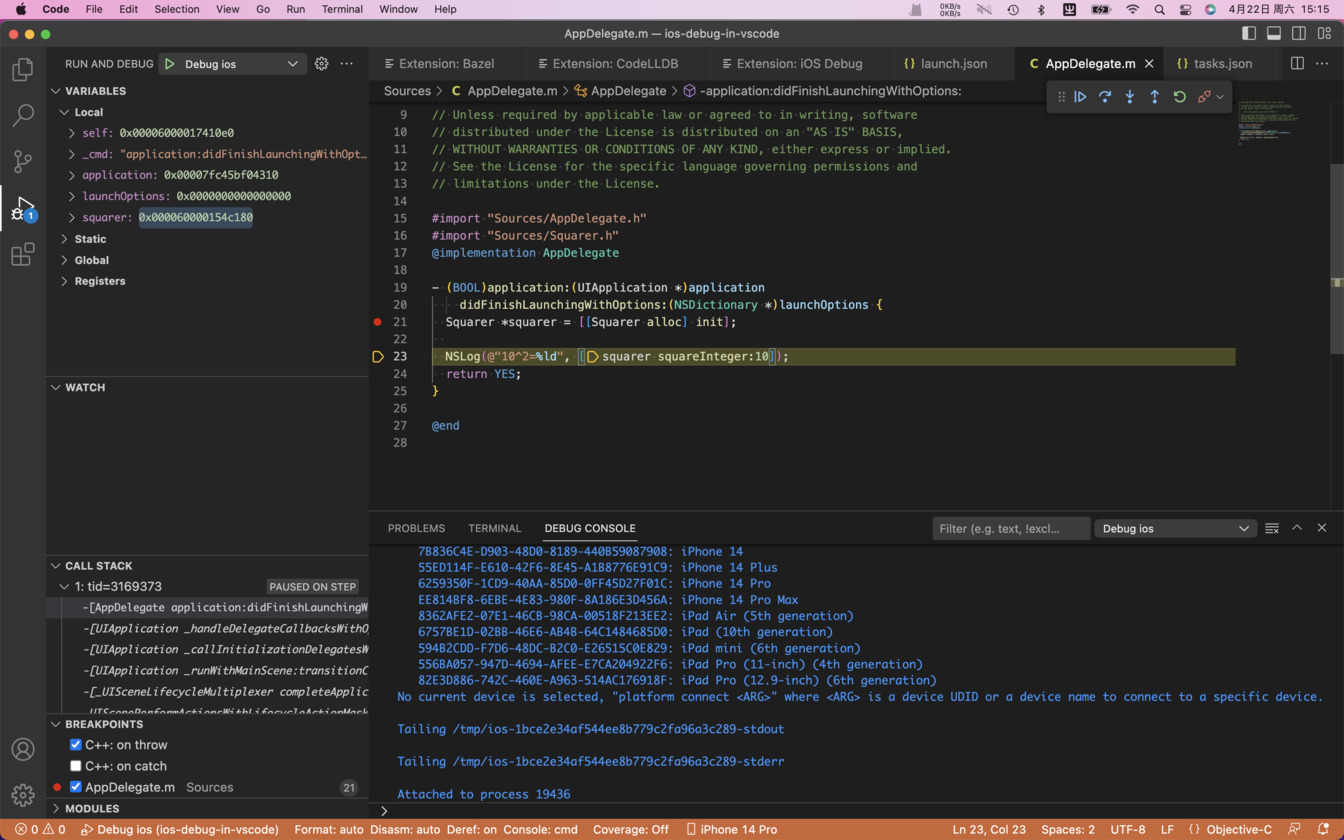
配置好之后,在源码需要的位置下断点,执行 F5 (Start debugging),等待 ios-debug插件自动安装app、启动debugserver、启动lldb调试器… 如果一切正常将触发断点,如下图:
如果发现iOS app 能启动,lldb 调试器也正常启动,但是断点不触发,且提示 “Resolved locations: 0”,大概率是debug symbol object 中的路径与 VSCode 打开源码的路径不匹配。
在 lldb 控制台中确认断点列表:
1 | (lldb) br list |
exact_match = 0, locations = 0 (pending) 代表确实没有加载到 debug 符号 >﹏<
或者使用 (lldb) breakpoint list --verbose 查看详细信息。
用 dsymutil 查看 symbol table:
1 | dsymutil -s HelloWorld.app/HelloWorld | grep 'N_OSO' |
输出:
1 | [ 34] 0000066b 66 (N_OSO ) 00 0001 0000000000000000 '/private/var/tmp/_bazel_~/297b0f28c164f78200b31511dd41bff4/sandbox/darwin-sandbox/13/execroot/_main/bazel-out/ios-arm64-min11.0-applebin_ios-ios_arm64-dbg-ST-2967bd56a867/bin/libSources.a(AppDelegate.o)' |
破案了,debug symbol object 路径不对,这是 bazel sandbox 路径,并不是真正的路径(直接访问是找不到文件的)。
直接禁用 sandbox :
1 | build --spawn_strategy=standalone |
让我们重来!
这回可以了:
1 | (lldb) br list |
如何调试 XCTest 呢?
配置 .vscode/tasks.json,定义一个编译iOS 单元测试 的 task build xctest,供 vscode 使用:
1 | { |
编写 build-xctest.sh,将xctest bundle 输出到 out/XCTestBundle 目录下
1 | set -e |
这个时候,不能直接用 ios-debug 插件封装的调试配置了,我们需要直接用 CodeLLDB的custom 启动模式来直接控制 lldb 执行调试命令,在launch.json的configurations中添加配置如下:
1 | { |
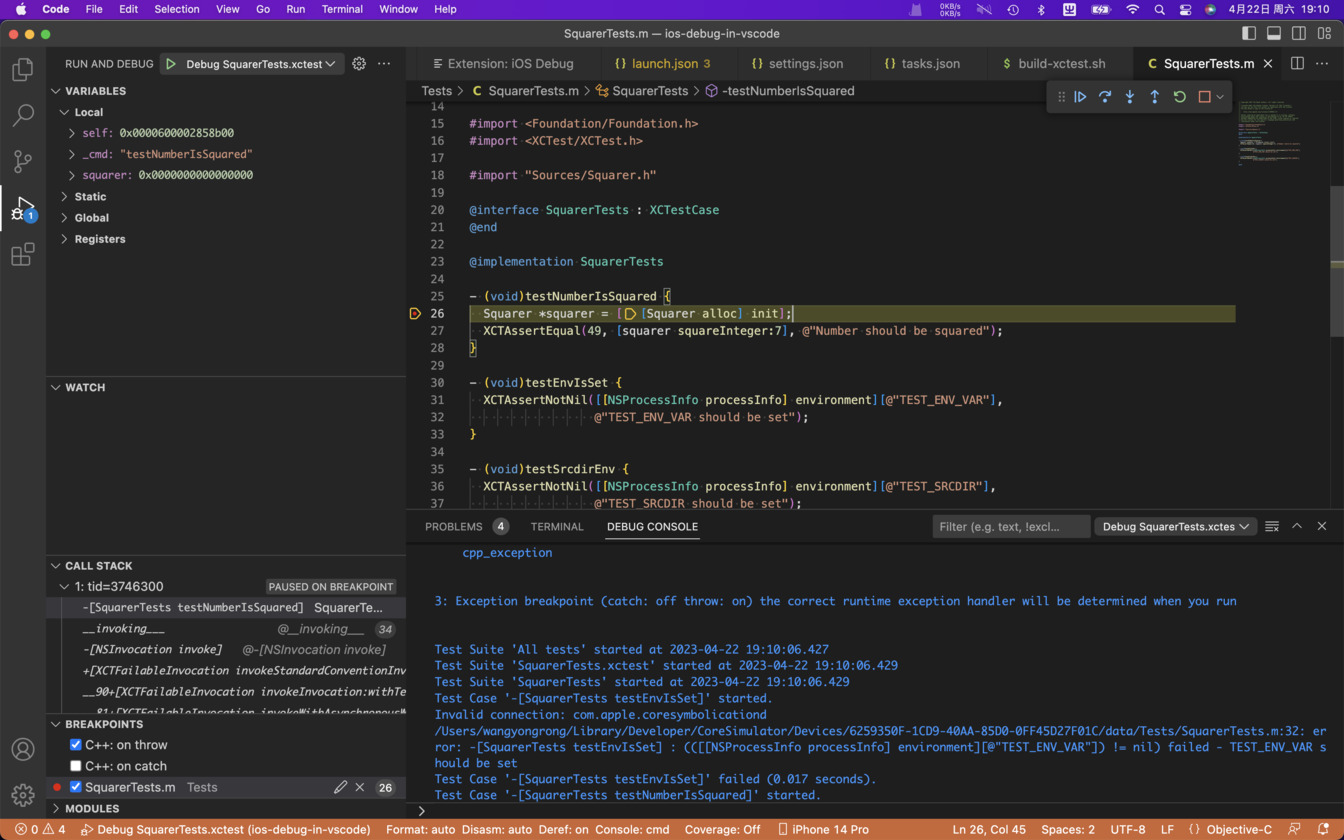
配好后,使用ios-debug 选择模拟器,在需要的位置下断点,F5 开始调试,如下图:
原理:
通过 lldb 直接调用 XCode iPhoneSimulator sdk 里的可执行程序 /Developer/Library/Xcode/Agents/xctest,间接启动编译好的 xctest产物。
platform select ios-simulator 旨在让 lldb 选择ios-simulator平台
platform connect ${command:ios-debug.targetUDID} 则是让 lldb 连上我们用ios-debug插件选好的 iPhone Simulator
file .../Xcode/Agents/xctest 设置 lldb 启动目标
run -XCTest All ... 就是让 lldb 带上启动参数执行我们设定好的目标 Xcode/Agents/xctest
那么,又如何调试带宿主的 XCTest 呢?
这种 XCTest 需要执行 host app 中的逻辑,所以需要将 xctest bundle 打到包里一起跟着宿主加载启动。
在苹果系统中,有一个/usr/lib/dyld 用于给程序加载动态库。
他存在一个很神奇的feature,可以根据环境变量 DYLD_INSERT_LIBRARIES 给程序注入 一个外部(没有被link的)dylib ,并让这个 dylib 先于程序被加载和执行,详见文章:Simple code injection using DYLD_INSERT_LIBRARIES 和 DYLD_INSERT_LIBRARIES DYLIB injection in macOS / OSX。
ps. 这个 dyld 甚至是开源的,你就说苹果开不开放吧
你猜的没错,iOS 也支持DYLD_INSERT_LIBRARIES。
XCTest 其实就是通过这个来实现的在宿主启动。
先使用 Xcode 编译一个XCTest (使用代码 XCTest-Demo)。可以看到通过 Xcode 编译的带 XCTest的Payload 如下:
1 | ~/Library/Developer/Xcode/DerivedData/testXCTest-btutvxyajiwigcbkzbzwfhtftckk/Build/Products/Debug-iphonesimulator/testXCTest.app |
其中有两个 dylib, libXCTestBundleInject.dylib 就是用来插入到宿主程序的。
给这个 XCTest 配置一个lldbinit 配置文件,用来调试 Xcode 是如何启动 xctest 的:
1 | echo "settings set target.process.stop-on-sharedlibrary-events 1" >> ~/.lldbinit-Xcode |
ps. 如果 ~/.lldbinit-Xcode 文件有内容记得先备份。mv ~/.lldbinit-Xcode ~/.lldbinit-Xcode.bak
pps. 在调试完毕后将 ~/.lldbinit-Xcode 恢复,不然你用 Xcode 调试其它app时有惊喜! rm ~/.lldbinit-Xcode && mv ~/.lldbinit-Xcode.bak ~/.lldbinit-Xcode
记得在Xcode 中编辑 Test scheme,启用 debugger。
程序启动后,可以看到马上触发了我们设置的断点:
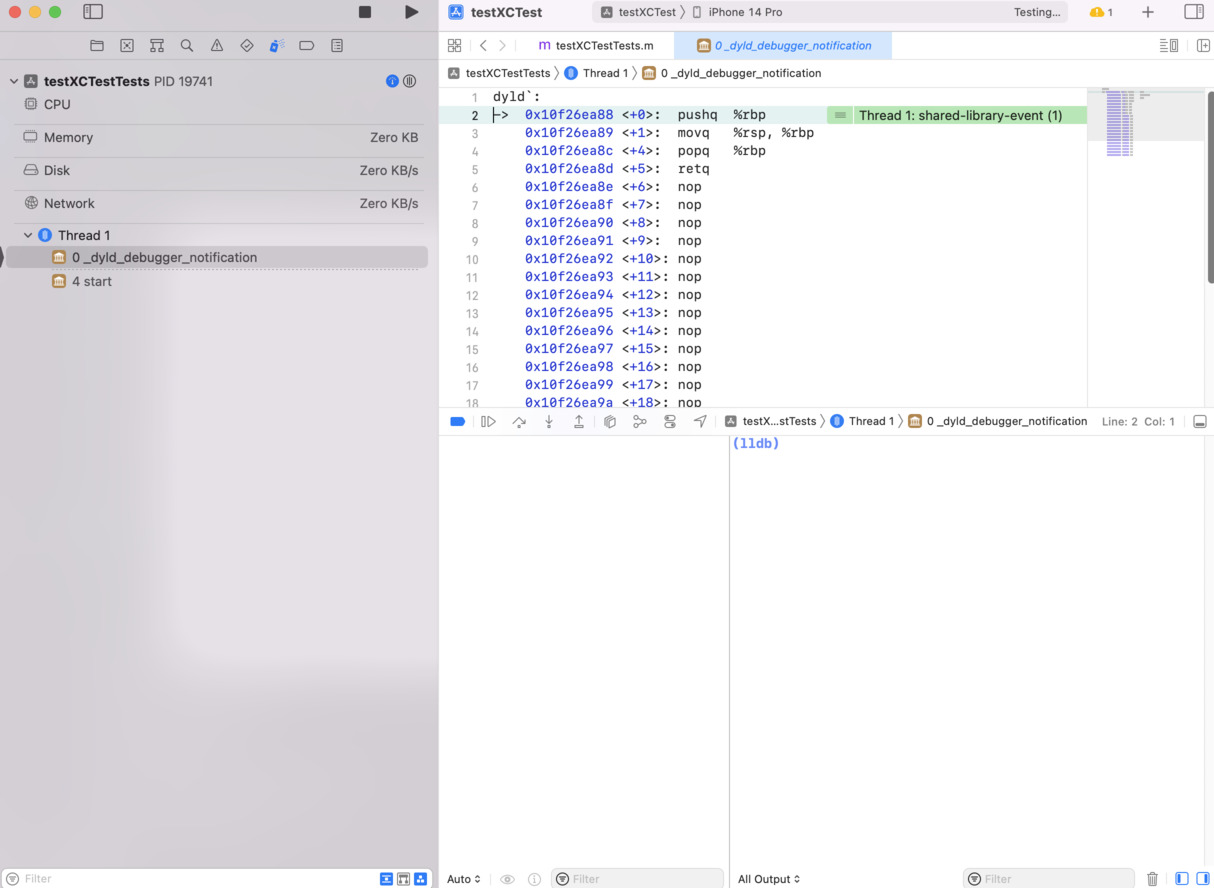
此时,可以用lldb image list 查看加载的 modules,可以看到其实没有libXCTestBundleInject.dylib(因为确实没被直接link):
1 | (lldb) image list |
经过单步调试跟踪,可以探知 XCTestCase 被执行的路径:
libXCTestBundleInject.dylib 被dyld加载并启动后,__XCTestBundleInject被执行,接着又会调用 XCTestCore 的_XCTestMain, 最终通过 +[XCTestDriver testBundleURLFromEnvironment] 从环境变量 XCTestBundlePath 中读取 xctest 路径并调用 XCTestDriver run,从而执行 xctest bundle 中带的 XCTestCase。
可以给获取环境变量的 NSProcessInfo 下断点:br s -n '-[NSProcessInfo environment]',在断点触发时,dump 环境变量,如下:
1 | (lldb) br s -n '-[NSProcessInfo environment]' |
了解完原理之后回到vscode中。由于 bazel 的 rules_apple 的 ios_unit_test rule 并不会打出上面形式的带有 XCTest bundle 的 Payload,尝试手动拼装出类似的包,喂给ios-debug,在 lldb 中配置类似的环境变量如下:
1 | { |
能够启动app,但发现并没有如预期那样执行 testcase,反而在控制台中丢下一段日志后直接退出了:
1 | HelloWorld[3031:605149] Unable to load a test configuration. Exiting. |
尝试在 _XCTestMain 下断点:
1 | (lldb) br s -n _XCTestMain |
重新启动,发现能够成功断到,说明libXCTestBundleInject.dylib的 inject 逻辑已经被执行。
通过 image lookup 也确实证明 XCTestCore 被加载了:
1 | (lldb) image lookup --symbol '_XCTestMain' |
但可能什么隐藏配置不对,猜测是 XCTestConfigurationFilePath 和 XCTestSessionIdentifier 环境变量有关 >﹏<,可能用于创建 XCTestSuite ……
时间有限,就不再继续研究了(因为大部分时间都要去反汇编XCTest相关Framework,意义不大~~
那么换个思路,自己写一个dylib 喂给 dyld,在这个dylib中执行 XCTestCase 行不行?
当然可以:通过反射或者 dlsym 直接调用 XCTestCore 等私有 Framework 的符号。。。创建 XCTestDriver 进而调用 XCTestCase。
代码可以参考 gist XCTHarness.swift。
好了,这个当课后作业留给你自己试一下了~
总结
通过本文,你学会了 vscode 如何自定义 tasks 和 launch configurations,应该已经可以直接手撸 lldb 调试各种程序了(包括别人编译好的app),同时也了解了 dyld 苹果系统里这个神奇的东西(千万别去试着注入别人的 app 然后说从我这学的),对 XCTest 启动原理也有所了解(没用的知识增加了)~
Refs
- 赠送一份lldb宝典:https://www.nesono.com/sites/default/files/lldb%20cheat%20sheet.pdf
- 测试代码来自于:https://github.com/bazelbuild/rules_apple/tree/master/examples/ios
- https://code.visualstudio.com/docs/editor/tasks
- https://code.visualstudio.com/docs/editor/debugging#_launch-configurations
- https://en.wikipedia.org/wiki/Mach-O
- https://www.unix.com/man-page/osx/1/dsymutil/
- https://github.com/vadimcn/codelldb
- https://github.com/nisargjhaveri/vscode-ios-debug
- https://github.com/ios-control/ios-deploy
- https://bazel.build/query/cquery#output-format-definition
- https://lldb.llvm.org/use/map.html
- https://lldb.llvm.org/use/remote.html
- https://chromium.googlesource.com/crashpad/crashpad/+/refs/heads/main/build/run_tests.py
- https://github.com/apple-oss-distributions/dyld
Author: Yrom
Link: https://yrom.net/blog/2023/04/22/debug-ios-app-in-vscode/
License: 知识共享署名-非商业性使用 4.0 国际许可协议