观前提醒:本文假设你已经有一定的 Flutter 开发经验,对Flutter 的 Widget,RenderObject 等概念有所了解,并且知道如何开启 DevTools。
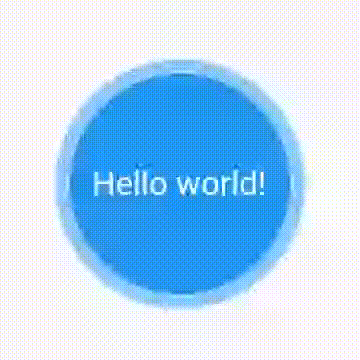
现有一个简单的汽泡动画需要实现,如下图:
直接通过 AnimationController 实现
当看到这个效果图的时候,很快啊,啪一下思路就来了。涉及到动画,有状态,用 StatefulWidget ,State 里创建一个 AnimationController,用两个 Container 对应两个圈,外圈的 Container 的宽高监听动画跟着更新就行。
代码如下:
1
2
3
4
5
6
7
8
9
10
11
12
13
14
15
16
17
18
19
20
21
22
23
24
25
26
27
28
29
30
31
32
33
34
35
36
37
38
39
40
41
42
43
44
45
46
47
48
49
50
51
52
53
54
55
56
| const double size = 56;
class BubbleAnimationByAnimationController extends StatefulWidget {
@override
_BubbleAnimationByAnimationControllerState createState() => _BubbleAnimationByAnimationControllerState();
}
class _BubbleAnimationByAnimationControllerState extends State<BubbleAnimationByAnimationController>
with SingleTickerProviderStateMixin {
AnimationController _controller;
@override
void initState() {
super.initState();
_controller = AnimationController(
duration: const Duration(seconds: 1),
vsync: this,
)..addListener(() => setState(() {}));
_controller.repeat(reverse: true);
}
@override
void dispose() {
_controller.dispose();
super.dispose();
}
@override
Widget build(BuildContext context) {
return Container(
alignment: Alignment.center,
constraints: BoxConstraints.tight(
Size.square((1 + _controller.value * 0.2) * size),
),
decoration: BoxDecoration(
shape: BoxShape.circle,
color: Colors.blue[200],
),
child: Container(
alignment: Alignment.center,
padding: const EdgeInsets.all(8.0),
decoration: BoxDecoration(
shape: BoxShape.circle,
color: Colors.blue,
),
width: size,
height: size,
child: Text(
'Hello world!',
style: TextStyle(color: Colors.white, fontSize: 12),
),
),
);
}
}
|
跑起来,很完美的实现了要求,如下图所示:

但且慢,仔细 review 一下代码,有没有发现,内圈的 Container其实和动画并没有什么关系,换句话说,它并不需要跟随动画一起被 build。
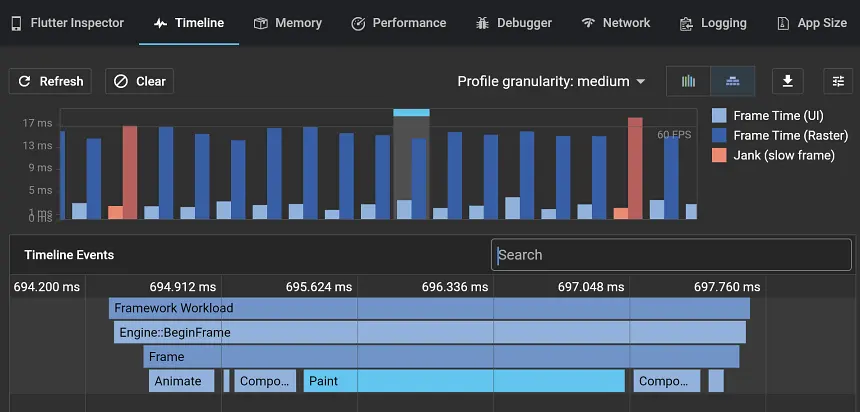
用 DevTools 的 Timeline 开启Track Widgets Builds 跟踪一下,如下图所示:

可以发现,在 Build 阶段,BubbleAnimationByAnimationController 因为 setState 引发 rebuild,进而重新 build 了两个 Container,包括内圈里的 Text。
解决办法也很简单,把内圈的 Widget 提前构建好,外圈直接用就行了:
1
2
3
4
5
6
7
8
9
10
11
12
13
14
15
16
17
18
19
20
21
22
23
24
25
26
27
28
29
30
31
32
33
34
35
36
37
38
39
40
41
42
43
44
45
46
47
48
49
50
51
52
53
54
55
56
57
58
59
60
61
62
| class BubbleAnimationByAnimationController extends StatefulWidget {
final Widget child;
const BubbleAnimationByAnimationController({this.child});
@override
_BubbleAnimationByAnimationControllerState createState() => _BubbleAnimationByAnimationControllerState();
}
class _BubbleAnimationByAnimationControllerState extends State<BubbleAnimationByAnimationController>
with SingleTickerProviderStateMixin {
AnimationController _controller;
@override
void initState() {
super.initState();
_controller = AnimationController(
duration: const Duration(seconds: 1),
vsync: this,
)..addListener(() => setState(() {}));
_controller.repeat(reverse: true);
}
@override
void dispose() {
_controller.dispose();
super.dispose();
}
@override
Widget build(BuildContext context) {
return Container(
alignment: Alignment.center,
constraints: BoxConstraints.tight(
Size.square((1 + _controller.value * 0.2) * size),
),
decoration: BoxDecoration(
shape: BoxShape.circle,
color: Colors.blue[200],
),
child: widget.child,
);
}
}
final Widget buble = BubbleAnimationByAnimationController(
child: Container(
alignment: Alignment.center,
padding: const EdgeInsets.all(8.0),
decoration: BoxDecoration(
shape: BoxShape.circle,
color: Colors.blue,
),
width: size,
height: size,
child: Text(
'Hello world!',
style: TextStyle(color: Colors.white, fontSize: 12),
),
),
);
|
通过 AnimatedBuilder 实现
其实 Flutter 官方提供的AnimatedBuilder就是这么做的,它将不变部分的 child 交由外部构建。
用 AnimatedBuilder 改造代码如下:
1
2
3
4
5
6
7
8
9
10
11
12
13
14
15
16
17
18
19
20
21
22
23
24
25
26
27
28
29
30
31
32
33
34
35
36
37
38
39
40
41
42
43
44
45
46
47
48
49
50
51
52
53
54
55
56
57
58
59
60
61
62
63
64
65
| class BubbleAnimationByAnimatedBuilder extends StatefulWidget {
@override
_BubbleAnimationByAnimatedBuilderState createState() =>
_BubbleAnimationByAnimatedBuilderState();
}
class _BubbleAnimationByAnimatedBuilderState
extends State<BubbleAnimationByAnimatedBuilder>
with SingleTickerProviderStateMixin {
AnimationController _controller;
@override
void initState() {
super.initState();
_controller = AnimationController(
duration: const Duration(seconds: 1),
vsync: this,
);
_controller.repeat(reverse: true);
}
@override
void dispose() {
_controller.dispose();
super.dispose();
}
@override
Widget build(BuildContext context) {
return AnimatedBuilder(
animation: _controller,
builder: (context, child) {
return Container(
alignment: Alignment.center,
constraints: BoxConstraints.tight(
Size.square((1 + _controller.value * 0.2) * size),
),
decoration: BoxDecoration(
shape: BoxShape.circle,
color: Colors.blue[200],
),
child: child,
);
},
child: Container(
alignment: Alignment.center,
padding: const EdgeInsets.all(8.0),
decoration: BoxDecoration(
shape: BoxShape.circle,
color: Colors.blue,
),
width: size,
height: size,
child: Text(
'Hello world!',
style: TextStyle(color: Colors.white, fontSize: 12),
),
),
);
}
}
|
再次跑起来,非常完美。DevTools 的 Timeline 如下图所示:

可以看到,Build 阶段完全没有 rebuild 内圈的内容,只有外圈 Container随着 rebuild。
且慢,还没完呢,还有没有办法完全不 rebuild 呢?毕竟这个动画很简单,内圈完全不变的,只有外圈随时间累加而放大/缩小。这个外圈动画自己画行不行?
用 CustomPaint 实现
Flutter 提供了一个Widget 叫 CustomPaint,它只需要我们实现一个 CustomPainter 自己往 Canvas 绘制内容。
先定义一个 CustomPainter,根据动画的值画外圈,代码如下:
1
2
3
4
5
6
7
8
9
10
11
12
13
14
15
16
17
18
19
| class _BubblePainter extends CustomPainter {
final Animation<double> animation;
const _BubblePainter(this.animation) : super(repaint: animation);
@override
void paint(Canvas canvas, Size size) {
final center = size.center(Offset.zero);
final radius = center.dx * (1 + animation.value * 0.2);
final paint = Paint()
..color = Colors.blue[200]
..isAntiAlias = true;
canvas.drawCircle(center, radius, paint);
}
@override
bool shouldRepaint(_BubblePainter oldDelegate) {
return oldDelegate.animation != this.animation;
}
}
|
特别注意,父类构造方法的调用不能省 super(repaint: animation),后面告诉你为什么。
其它代码跟之前没什么两样,如下:
1
2
3
4
5
6
7
8
9
10
11
12
13
14
15
16
17
18
19
20
21
22
23
24
25
26
27
28
29
30
31
32
33
34
35
36
37
38
39
40
41
42
43
44
45
46
47
48
49
50
51
|
class BubbleAnimationByCustomPaint extends StatefulWidget {
@override
_BubbleAnimationByCustomPaintState createState() =>
_BubbleAnimationByCustomPaintState();
}
class _BubbleAnimationByCustomPaintState
extends State<BubbleAnimationByCustomPaint>
with SingleTickerProviderStateMixin {
AnimationController _controller;
@override
void initState() {
super.initState();
_controller = AnimationController(
duration: const Duration(seconds: 1),
vsync: this,
);
_controller.repeat(reverse: true);
}
@override
void dispose() {
_controller.dispose();
super.dispose();
}
@override
Widget build(BuildContext context) {
return CustomPaint(
painter: _BubblePainter(_controller),
child: Container(
alignment: Alignment.center,
padding: const EdgeInsets.all(8.0),
decoration: BoxDecoration(
shape: BoxShape.circle,
color: Colors.blue,
),
width: size,
height: size,
child: Text(
'Hello world!',
style: TextStyle(color: Colors.white, fontSize: 12),
),
),
);
}
}
|
跑起来,跟之前版本一样的完美。

你可能好奇了,CustomPaint 怎么会自己动起来呢?其实,秘密就在 CustomPainter 的构造方法里的 repaint 参数。
由CustomPaint创建的 RenderObject 对象 RenderCustomPaint 会监听这个 repaint,而该对象是外部传入的 _controller,动画更新触发markNeedsPaint(),进而画面动起来了。可以戳这里看一眼 RenderCustomPaint 源码。
这次 DevTools 的 Timeline 如下图所示,完全没有了 Build 的踪影:
再且慢,还没结束。到这里只是解决了 Build 阶段频繁rebuild 的问题,看上图所示,Paint 阶段似乎还能再挤几滴性能出来?
最后的最后
怎么跟踪查看 repaint 呢,总不至于打log吧?
开启 DevTools 的 Repaint RainBow 选项即可。或者在代码中设置debugRepaintRainbowEnabled = true。
在手机画面上立马会看到色块,如果画面上有动画的话更明显,其会随着 paint 的次数增加而变化,像彩虹灯一样。如下图:

可以看到,整个 APP 界面包括头部的 AppBar 的颜色是跟着内部的汽泡一起变的,说明在随着内部动画而发生 repaint。
Flutter 提供了一个 RepaintBoundary 用于限制重绘区域,专门用来解决此问题。
使用方式很简单,直接套在CustomPaint外面,代码如下:
1
2
3
4
5
6
7
8
9
| @override
Widget build(BuildContext context) {
return RepaintBoundary(
child: CustomPaint(
painter: _BubblePainter(_controller),
child: Container(...),
),
);
}
|
效果立杆见影,彩虹图如下图所示,只重绘了动画的区域:

相对应的,Paint 阶段耗时也很明显的降低:

结语
恭喜你,又离资深 Flutter 开发更近了一步。通过本文,你应该学会了如何让 Flutter 动画动得更有效率。
还在等什么呢,赶快回去按本文思路优化你项目中的动画吧。
如有更好的思路,或者其它的点,欢迎留下你的评论。
p.s. 本文完整代码见 https://gist.github.com/yrom/2f97aacf82feeb0d600c73ff47648dda